
Touch Controller Kit
Table Of Contents:
Overview
Touch Controller Kit has seven different types of input controllers and some other touch visualization tools. You can use a combination of these input controllers to achieve almost all types of controls for your games.

-
Visualize Touch
-
Animate Touches with a beautiful animation.
-
Draw a straight line on the screen.
-
Display a touch trail that follows the touch on screen.
-
Swipe Controller
-
Racing Touch Controller
-
4-directional Swipe.
-
8-directional Swipe.
-
Tap, Double Tap, Triple Tap, Long Tap.
-
Touch left side of screen. (Like move left in racing)
-
Touch right side of screen. (Like move right in racing)
-
Touch with both fingers. (Like to implement boost)
-
Tilt Controller
-
Tilt Control for devices in all axis.
-
Joystick
-
On-Screen virtual Joystick on left side.
-
Rotate camera around with right finger.
-
Can customize look and settings.
-
TouchPad
-
Creates an invisible pad on-screen like Joystick.
-
Simulates Joystick with touches only.
-
Rotate camera around with right finger.
-
Zoom and Pan
-
Zoom in or out in 2D or 3D Environment.
-
Pan around the world.
-
Set bounds to zoom and pan to limit to a specific level.
How to use this Asset
The prefabs folder inside this Touch Controller Kit assets' folder contains all the necessary prefabs needed for all types of inputs for phones. Choose the (Prefab) Input type you want to use in your project and drag it inside your scene hierarchy. For example, if you want a zoom and pan functionality in a 2d game then you need to drag 2DCamZoomAndPan prefab into your scene. Each of the controller prefabs have some settings and variables in the inspector that may be tweaked and adjusted according to your needs. If you are unsure of what a variable does then you can hover over its name and a pop-up will appear explaining its function.

There is also an ExampleImplementation.cs script inside the asset which contains sample codes on using various types of controllers in your game. Lastly, if you are reading this documentation online then there is also an offline version of this added as a ReadMe! file inside the asset itself.

If you need help setting up specific asset check out the following sections.
How to Implement Swipes And Taps
The Swipe Controller gives functionality for 4-directional and 8-directional swipe as well as several types of tap controls such as tap, double tap, triple tap or long tap. Drag the Swipe Controller prefab from the prefabs folder into your scene. Adjust the values in the inspector. Most values are self-explanatory but you can hover the mouse over them to know more about it. You can switch between 4-directional and 8-directional swipe by changing the first value in the inspector.

Now, in the script you want to use the swipe or tap you need subscribe to some delegates. You should only subscribe to those specific delegates you will need in your game. You could also subscribe to all the delegates as given in the ExampleImplementation.cs script and only use the ones you want, leaving the other delegate event callbacks empty.
It is necessary to subscribe to these delegates in onEnable and unsubscribe in OnDisable as shown in the images below.
.png)
.png)
Now, Implement all the event callback methods as shown in the image. All your code (the thing that you want to do when the event gets called) corresponding to an specific event goes inside these respective callback methods. You can check out the ExampleImplementation.cs for more in-depth code.
.png)
How to use Racing Touch Controller
This controller is used mainly in racing games. This controller triggers event when a touch happens either on the left side of the screen or on the right side of the screen or when both sides are touched simultaneously.
You can use the left and right touches to move your vehicle left or right and trigger a boost when both sides are touched simultaneously.
To use this controller, you need to drag the controller prefab from the assets' prefabs folder to your scene. You can adjust and tweak the value in the inspector to suit your needs. Hover over the variables to know more about them if it confuses you.

Now in the script you want to use this controller, you need subscribe to some delegates. You should only subscribe to those specific delegates you will need in your game. You could also subscribe to all the delegates as given in the ExampleImplementation.cs script and only use the ones you want, leaving the other delegate event callbacks empty.
It is necessary to subscribe to these delegates in onEnable and unsubscribe in OnDisable as shown in the images below.

Now, Implement all the event callback methods as shown in the image. All your code (the thing that you want to do when the event gets called) corresponding to an specific event goes inside these respective callback methods. You can check out the ExampleImplementation.cs for more in-depth code.
You can also give ability to players to move left or right by tilting device. You should check out the next section on how to use the tilt controller if you want to implement that.


How to use Mobile Tilt Controller
This controller is used to implement tilt in your games in almost any direction. You must check which direction tilt you need carefully.
To use this controller, you need to drag the controller prefab from the assets' prefabs folder to your scene. You can adjust and tweak the value in the inspector to suit your needs. Hover over the variables to know more about them if it confuses you.
Now in your script, you need to create a Vector3 that will hold the tilt value and also create a reference to the TiltController as shown in the image.


Then, you can use the TiltController.GetTilt() function inside Update function and store the value inside a Vector3 and use it as you need. This is shown in the image.
You should only use tilt directions that you need, mostly its x and y axis.

How to implement Joystick or use touches as Joystick
These controllers will help you to implement a joystick or simulate touches just like a joystick and also rotate camera around when a player touches and drags on the right side of the screen. By using this joystick you can also switch between movement by joystick or touch and can also enable or disable camera rotation.
To use this controller, you need to drag all three prefabs- Joystick and the other two as shown in the image. You need to adjust and tweak the value for all three separately as you require. Hover over the variables to know more about them if it confuses you. Please note that even if you don't want all three functionalities you must still drag all three prefabs in your scene as they are dependent upon each other.
Now to use a specific type of controller you need to adjust the Move Pad Type in the inspector of JoystickAndTouchInputHandler.
Set this to joystick or touch to use either one. You can disable the camera rotation feature in the inspector of TouchPadAndCameraRotater prefab.
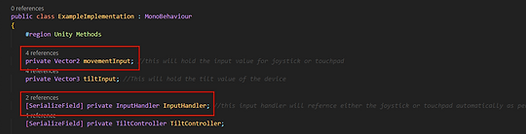
Now, going towards the scripting side, you first need to create a Vector2 that will hold the input value and also create a reference to the InputHandler. The input handler is the one which will actually control all types of inputs whether joystick or touch.


Initialize the inputhandler as shown in this image.
Set the inputhandler prefab in the inspector slot.
Now, use the InputHandler.GetHorizontalInput() and InputHandler.GetVerticalInput() to get horizontal and vertical input values and store this inside the Vector2. You can then use this input vector to drive your character according to its value without worrying about whether it is a joystick or touch input.

How to implement Zoom and Pan


This controllers will let the players zoom or pan in 3D as well as 2D. You can also set min and max zoom levels and you can also bound the pan between a min and max in each of the axis.
Implementing Zoom and Pan is simple. All you have to do is drag the respective prefab to your scene. For example, if the project you are working in is 3d then drag the 3DCamZoomAndPan else drag the other one. Set the zoom levels in the inspector and also set the pan bounds. The pan bounds is specified in respect to camera's position. For example, If your min and max x-axis pan bounds are -30 and 30 then the camera's x-axis position cannot go below or above the min and max value while panning.
Due to the above approach you may initially get a "screen point out of view frustum" error if your camera's position is way more or less than zero since the camera's default pan bound values are set assuming that the camera is initially at (0,0,0) position. To fix this when you drag the prefab into your scene set the pan bounds according to your camera's current position.
How to Visualize Touches on Screen, Draw Line or display a Touch Trail
The Visualize Touches prefab gives you various options for touches. You can animate touches with an image , draw a straight line with touches and can also display a touch trail that will follow the touches on the screen. To use it, you just drag the prefab into your scene, enable only the functionalities that you want and set the max Touch Count to the value you want. Max touch count means how many simultaneous touches on screen you want to visualize since most modern devices supports multi-touch. We recommend setting it to one only for best performance.
The children of the Visualize Touch prefab contains the visualization components that will be drawn on touch you can edit them to make it look how you want. The touchspawn is the image that gets animated when a touch occurs and the other components are as their name suggests.


How to Combine Several Controllers to create a more Robust Custom Controller
Every controller is provided in this asset separately. But you can use simultaneously to create custom controllers that your game needs. You can use the joystick and the tap simultaneously and like-wise you can make combination of two or more input controllers. Please note that not every controller would work with each other as they all use the same functionalities such as touches they may interfere with each other which could wrongly trigger an event. So, double check that everything is working correctly while using combination of controllers.
For example, if you are using joystick then you can use it with tap as it will not interfere with taps, however you cannot use it with touchPad as it will interfere with the taps. Similarly you can make a combination of several other and try out to see if it works in your case. We have prepared a list whose combination should work perfectly.
-
Joystick & Visualization tools must work well with most others.
-
Swipe and Racing touch controller must work without interference.
-
Tilt must work with most others.
-
Further you can use Double tap, triple tap and ling tap with almost all other.
-
For other types of usage, you can disable the interfering controller, enable the other one and when it is no longer needed, disable it and re-enable the former one.
If all these documentation didn't help you or you are encountering an error then do do contact us from the contact section or email us from asset store page. We will try to help you with the best we can.
Don't forget you can also order a custom controller customized for your specific game for an extra charge. Just contact us in either case.